

Clock Products
The making of wooden clock faces has become extremely popular. These allow the students to do some exciting and interesting online research and there are many exciting clocks produced. This is an extremely popular project.
PUTTING TOGETHER A CLOCK

Drill a 8.5 mm hole through the clock face to insert the movement shaft.
A hanger bracket (if used) is placed over the raised collar.
Place the rubber washer onto the shaft.
Place the clock face in the correct position
Place the brass washer followed by the hexagon brass nut. Tighten the nut so that it is finger tight.
Gently press the hour hand onto the shaft at the 12 o’clock position
Then press the minute hand onto the shaft at the 12 o’clock position
Press second hand gently onto the pin inside the shaft
Make sure there is clearance between the hands. Slightly bend the hands so that they do not catch on each other or on any design elements.
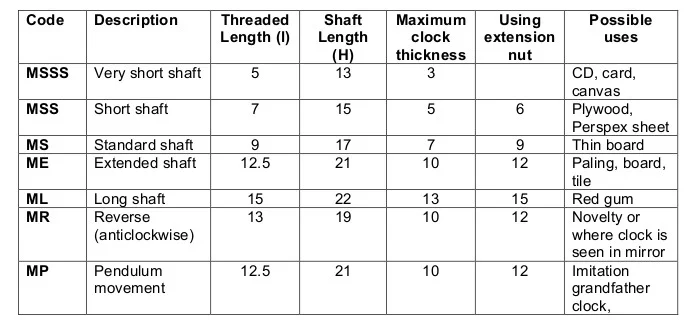
CHOOSING A MOVEMENT
The shaft length of a Quartz movement required is determined by the thickness of the material used to construct a clock face. We supply the following clock movements:
All our movements and operators each take one AA (if using a PENDOP and a movement 2 batteries will be required).
Which movements and hands would be suitable for use with laser cut clock?
A laser cut clock face can be made from a number of different Sustainably sourced items. The size and thickness of the material will determine the shaft length chosen and the length of hands. I would suggest getting a small, medium and larger set of hands. Usually black works best for most materials.
We suggest checking with the students to determine what material they plan to use before ordering the movements and hands.
What is an extension nut? How is it used?
The extension nuts are designed to be used instead of the normal brass nut and washer, to allow you to use thicker material than you would otherwise be able to use (it extends the length of the shaft).
Pendulum Operator
The Pendulum operator (PENDOP) which can be used with any other movement with a different shaft length, but the longest shaft movement (ML) we stock goes up to 15mm with an extension nut (ENUT). When using a pendulum operator the length of the shaft decreases. The maximum material thickness is 13.5 to 14mm.
CLOCK HANDS
Choosing the correct hands
The clock hands are available in a large range of styles and sizes. The hands are measured from the centre of the hole in the hand. Choose the hands that best suit the clock design and required length.
If the hands are too long they can be trimmed to a shorter length. Some hands are more suitable for this e.g. No. 270. It is advisable to trim both the hour and minute hands to keep them looking proportional.
The hands can be painted to add a different design element. The clock hand No. 211 makes an ideal choice for painting a miniature design.
The clock hands bend when the students push them onto the shaft. Can you suggest a solution?
Did you know that your ballpoint pen makes a great tool for pushing on clock hands? Simply remove the ink and tip and the end cap. Start with the hour hand. (Remove the plastic film coating). Push on. Next push on the minute. The second hand needs to be pushed on straight with your fingers.
CLOCK NUMERALS
How do I know where to place the numerals on my clock face?
There are a number of ways to determine the placement of numerals including:
a) Prepare a dial template. You can find examples on the web or make one yourself.
b) Use a compass to draw a circle the size of your clock face. Use a ruler to draw a small mark at 12 o’clock, 3 o’clock and 6 o’clock. Use the ruler to measure the distance between the centre of the 12 and the 3. Divide the number by three. This is the distance between each number on the clock face.
c) Use a protractor to determine the degrees. 12 o’clock is at 90 degrees. There are 30 degrees between each numeral.
d) Place all clock hands at 12 o’clock. Move the minute hand (longest hand) around the clock face. Mark the place the hour hand stops when the minute hand reaches the 12 o’clock position. Continue until all positions are marked.
e) Ask us to email you a “Numeral Positioning Guide”.
f) A clock face and numerals can be designed using a wide range of techniques and skills. There are no rules stating that you must use numerals.
PENDULUM MOVEMENTS
The quartz pendulum movements sold by Scorpio Technology mimic a traditional pendulum swing. The manufacturer recommends that Heavy Duty AA batteries should be used in these movements.
Pendulums
The quartz movement pendulums are light weight. We stock two different styles – a shorter . They not included in the price of the movement.
If you re-use a pendulum from an existing clock you need to be sure it will fit correctly so that the pendulum has space to swing.
The pendulum is too long for my clock. How can I shorten it?
Remove the bob from the pendulum rod. Cut off the required amount to suit your clock design. Slip the pendulum bob back in place. You may need a dab of hot glue to keep it in place.
I would like to make my own pendulum bob. What do you suggest?
A pendulum bob can make a fun design element on a clock e.g. a cat clock with a swinging tail.
If you manufacture a pendulum bob it is important to remember to keep it lightweight. If it is too heavy the quartz movement may not work correctly.
When making your own pendulum bob you may wish to order the 170mm pendulum rod (PENDULUM ROD 170mm) rather than the complete pendulum.
What is the swing of the Pendulum?
We measured the swinging Pendulum A on one of our MP Pendulum movements.
The nut holding on the bob weight, is 25cm from the centre of the clock (the movement’s shaft). That nut – in the course of a swing – moves approximately 10cm from one extreme to the other. That is, the end of the pendulum moves about 5cms in both directions from the centre line of the clock.
WOODTURNED PEN
Download instructions here: How is the wood mandrel used to turn a wooden pen?